Sunday, July 26, 2009
It's HOT
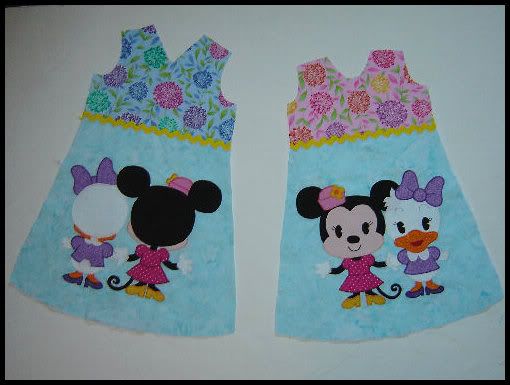
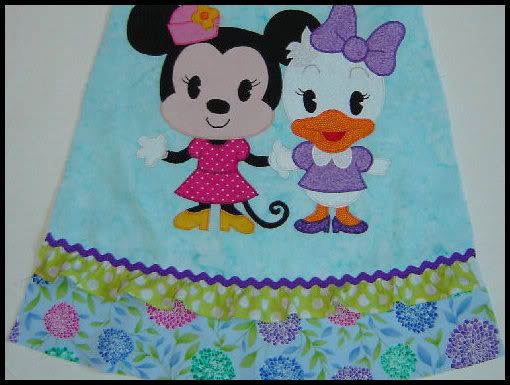
I love this area of Oregon because we usually have fairly moderate weather. Sure there's quite a bit of rain for 3/4 of the year but having green scenery around all year is worth it. Unfortunately, we've had some extremes this past year with record snowfall before Christmas and now record highs this week. I do OK in the cold since I can keep warm inside. The heat, though, just wears me out and saps all motivation to sew. I got some appliques cut out and assembled but will wait to sew until it cools off a bit this evening (I hope). I did get some photos as I went along on one of the appliques so I could write an update on a tutorial I did more than a year ago.
Saturday, July 25, 2009
Vida "Sew-A-Long" Tutorial
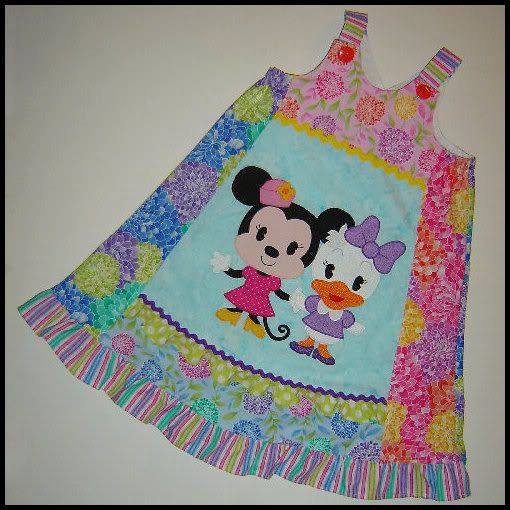
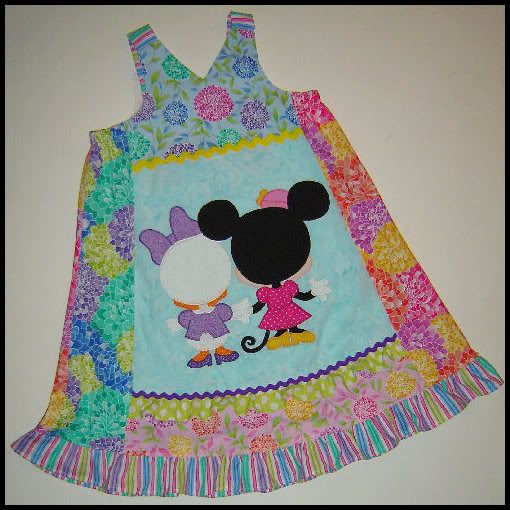
I love the Farbenmix Vida dress. It's so versatile and fun to make. I also think it's a good pattern for people who are new to sewing while definitely a good 'canvas' for those who love to embellish a garment. I don't know how many dresses I've made but I certainly haven't run out of ideas. I especially love that I can easily use several prints on one dress - a great way to use some remnants from previous projects. Some day I want to make a dress where no two pieces are cut from the same print.
Although the pattern and instructions are easy to follow, I know some people find it helps to have more detailed steps and photos of the process. As such, I decided to document the main steps I go through as I create a dress. I hope this helps others as they start their own exploration of the possibilities with this pattern.
Preparation
1) Farbenmix patterns are done in the 'Euro' style and do not include seam allowance. All pieces and sizes are printed on a single page of large paper. The pieces are not intended to be cut from that paper but instead it's necessary to trace each piece. Where the line is solid, all sizes share the same line. Where the sizes differ, the lines for each size is printed in a different type of line, i.e. dots, dashes, etc.
Tip Go over the lines of the size you need with a colored pencil, crayon, highlighter or other tool to make it easier to see the line when tracing as described in step 2.
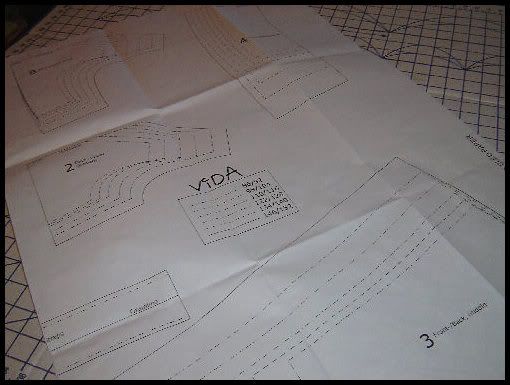
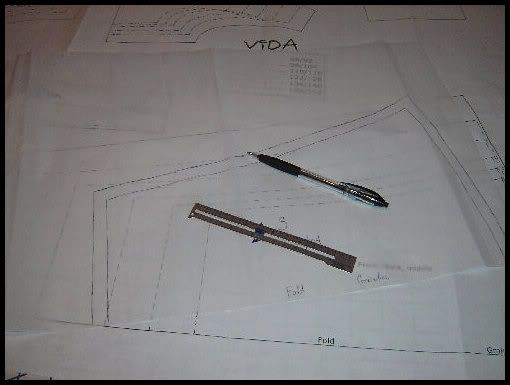
2) Trace all pattern pieces adding an even seam allowance to all sides of the piece EXCEPT where an edge is placed along a fold when cutting the fabric. For the Vida, this includes the center edge of these pieces: front upper (bodice), back upper (bodice), front bodice lining, back bodice lining, front/back middle and front/back lower. Transfer all pattern markings, such as grain line, to the traced piece. It also helps to label the pieces with their name and the size as well.
Tip Plain white tissue paper is an inexpensive material to use for this purpose. However, if you'll be using the pattern repeatedly, using something more durable is a good idea. One option is to use non-woven lightweight interfacing (not the fusible kind). There is a product available at many fabric stores called Pattern Ease that is specifically designed for this type of use.
Tip A simple tool to help you get an even seam allowance are two pencils taped or held together with a rubber band. Follow the line of the pattern with one pencil and have the other positioned so it goes along the outside of the pattern. As you trace the line, the second pencil will draw a parallel line that will be your cutting line.
Tip I make dresses in a variety of sizes so I started color-coding my patterns when I trace them. For example all pieces for the size 86/92 are traced onto yellow tissue paper. This makes it easier for me to quickly find the right pattern pieces especially if I'm cutting two sizes out at once... something I do occasionally for sisters.
Cutting the Fabric
3) Cut all pieces as indicated on the pattern cutting list. Be sure to follow the markings for the grain line. For the pieces to be cut along the fold, place fabric with right sides together with the fold following the lengthwise grain of the fabric.
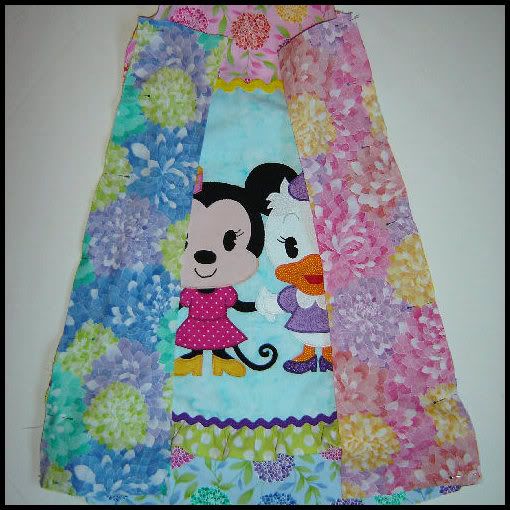
Tip I love to use a different fabric for each main section of the dress. For example one fabric will be used for the front and back upper (bodice), a second for the front/back middle, a third for the front/back lower, a 4th for the straps (and I also use that fabric for an added bottom ruffle not included in the pattern) and one or two additional fabrics for the sides. I hate to use my wonderful fabric prints where they don't show so I typically use a solid fabric for the bodice lining.
Tip If you plan to use different prints for the side panels, make sure you cut 2 with the pattern piece facing up (on the wrong side of the fabric) and 2 with the pattern piece facing down (on the wrong side of the fabric). What I like to do is use 2 different prints for the side. I have one fabric placed with right side up and lay the second over it with right side down. I then cut one set of pieces with the pattern right side up and repeat it exactly the same for the second set of pieces. By doing it this way, when the dress is finished, no two pieces of the same fabric are sewn together.
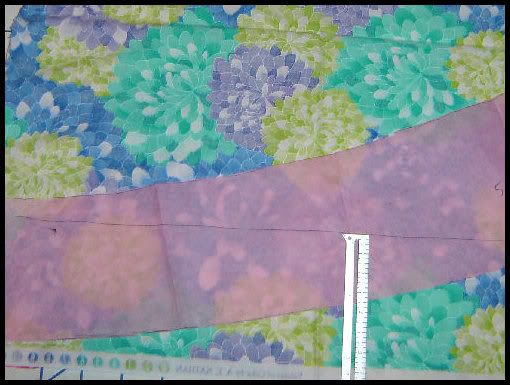
Tip The side panels need to be cut slightly on the bias. This means the grain goes on an angle across the piece rather than straight up and down. To be sure I have the pattern piece oriented correctly, I measure from the marking on the pattern to the selvage of the fabric at both ends of the pattern piece.
Appliqué
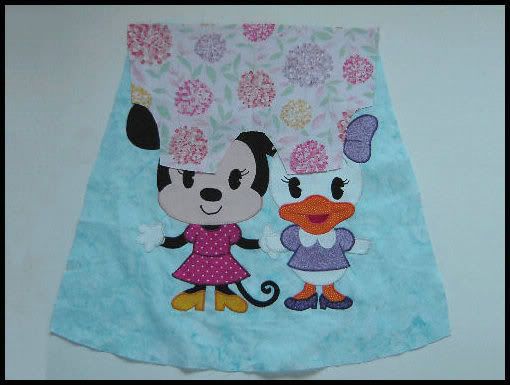
4) Once all pieces are cut, it's time to add any appliqué or similar embellishment that won't be added over a seam.
Assembly
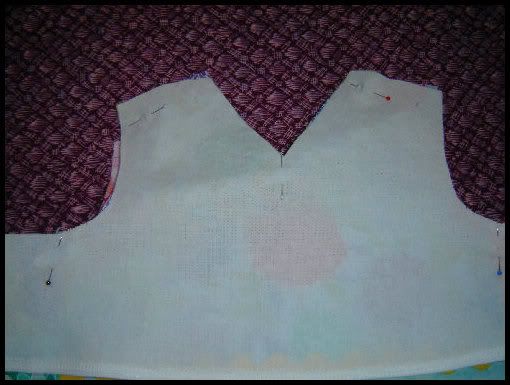
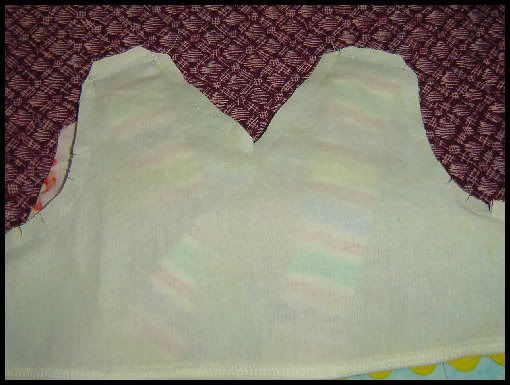
5) Stitch the lower edge of the front upper (bodice) to the top edge of the front middle with right sides together. Make sure the center of each piece lines up. Repeat with the back upper (bodice) and back middle pieces. Finish the seam and press toward the bodice.
Tip Once these pieces are stitched and the seam is finished, now is a good time to add ricrac or a similar trim over the seam line. This way the cut edge of the trim will be enclosed in seams in a later step.
6) Stitch the lower edge of the front middle to the top edge of the front lower piece with right sides together. Make sure the center of each piece lines up. Repeat with the back middle and back lower pieces. Finish the seam and press toward the lower pieces.
Tip Because the edges being sewn together are curved, it may help to pin the pieces before stitching.
Tip As much as I try to be accurate when tracing, cutting and stitching, I find that I usually have slight 'overhang' where one piece might be slightly longer/wider than the piece to which it's sewn. When that happens, I just carefully trim the excess so it lines up evenly.
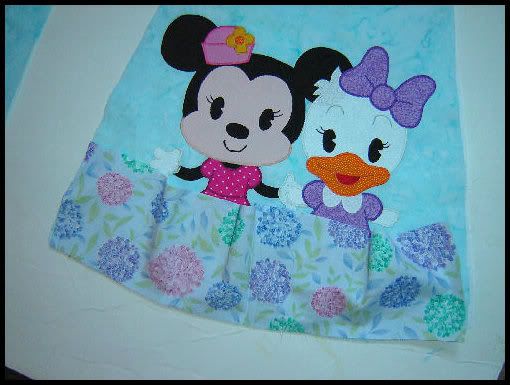
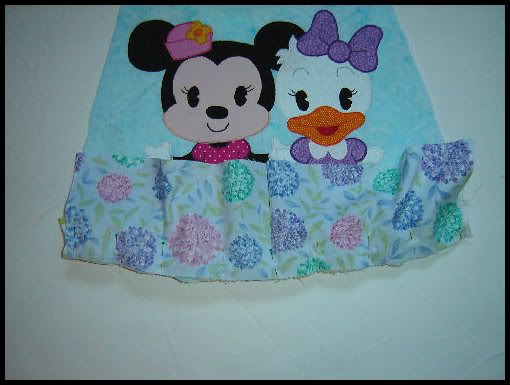
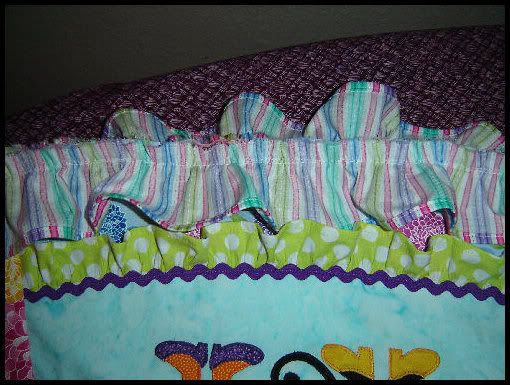
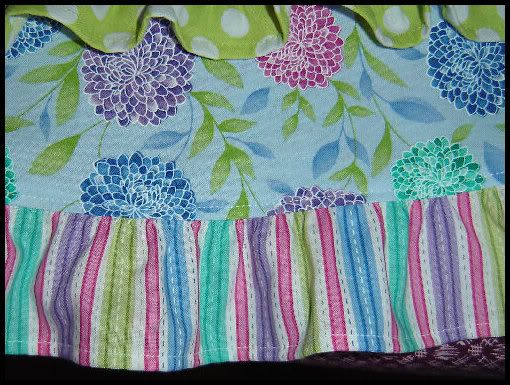
Tip Although the pattern does not include ruffles, it's simple to add them to the bottom edge of the front/back middle. The size of the ruffles can vary based on your preference. I like to have the ruffles approximately 2" long after one edge is finished (this includes the seam allowance). I make the width before gathering twice the width of the lower edge of the middle piece. I don't worry about exact measurements, though. Basically I cut strips the full width of the fabric (42-44" wide), hem and gather with my ruffler foot. When I pin it in place, I trim off any excess length. The only problem with this method is that I find it hard to toss those little ruffles. Some day I'll gather then all up and use them in a twirl skirt. LOL
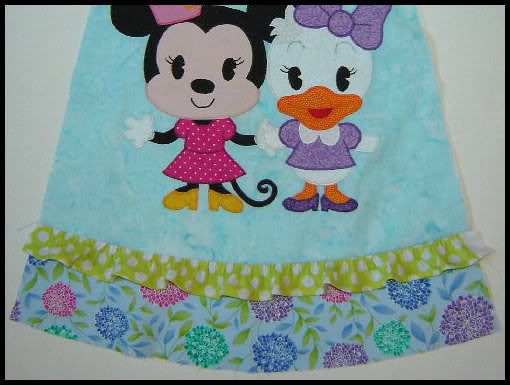
Tip Once these pieces are stitched and the seam is finished, now is a good time to add ricrac or a similar trim over the seam line (or above the ruffle if one is added). Since the seam curves slightly, make sure whatever trim you use can follow the curve easily. That's why I like using ricrac on this seam. The seam at the bodice bottom is straight so non-curving trim, such as embroidered ribbon, can be used there easily.
7) Stitch one side piece to the assembled front middle pieces with right sides together. Make sure the edge of the side piece stitched is the edge that curves outward at the middle (convex). Repeat with the other side piece that is a mirror image of the one used. Finish the seams and press toward the side. Repeat for the back piece. With right sides together, stitch assembled front and back along both side seams. Finish the seam and press toward the back.
Tip Because the edges being sewn together are curved, it may help to pin the pieces before stitching.
Tip Once the side pieces are stitched to the front and back, more trim or decorative stitching can be used on the finished seams.

8) Stitch front bodice lining to back bodice lining at the side seams. Finish edges and press toward the front. Attach fusible interfacing to back center V and where the buttonholes will be located on the front.
Tip To finish the lower edge of the lining, once the side seams are finished I serge along the lower edge trimming just a small amount as I go. This allows me to easily turn up an even amount as I press. I then stitch this in place.
Tip I suggest pressing the lining side seams to the front so there is less bulk where the lining seams and dress side seams meet.
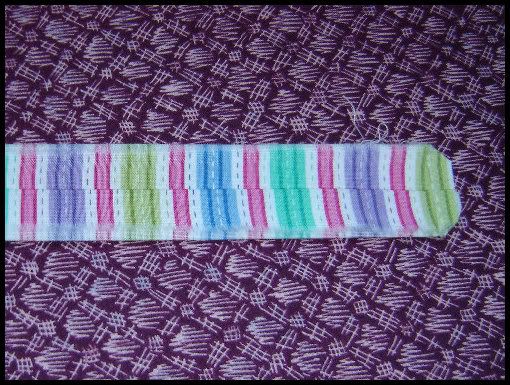
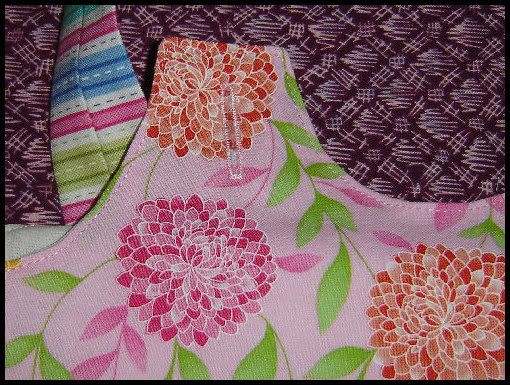
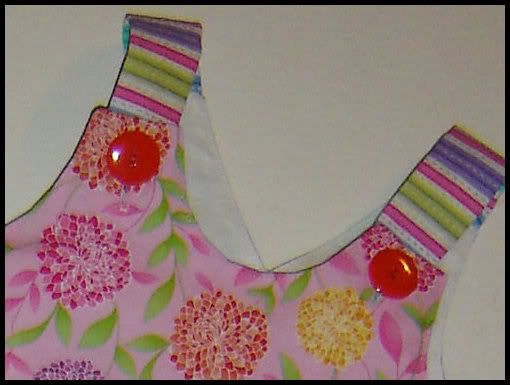
9) Fold one strap piece along the length right sides together and stitch the long edge only. Finger press the seam open and position the seam in the center. Stitch the short edge and trim excess fabric. Press the center seam open. Trim the excess fabric from the end including clipping the corners at an angle. This makes it easier to get a nice crisp point on each corner. Turn right side out and press again to center the seam along the back center of the strap. Repeat with second strap.
Tip Even more ricrac or trim can be added to the strap. Sew it down the center of the strap lengthwise before stitching the strap. Once the length and end seams are sewn and the strap turned right side out, the trim should be centered on the finished strap.
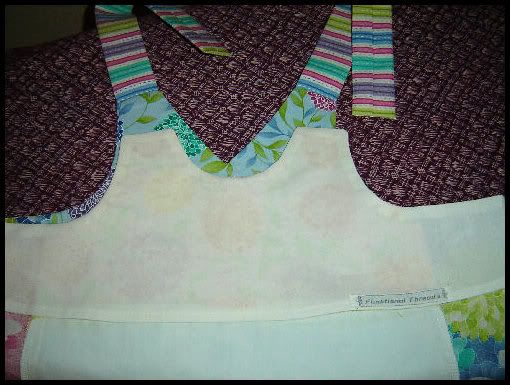
10) With lining inside out and dress right side out, pin the lining to the dress making sure to match the side seams, center front and center back. Stitch along the top edge leaving the place where the straps will be attached un-stitched. Insert straps between lining and dress so the unfinished edge lines up with the edge of the lining. The strap seam should be facing the right side of the lining. Stitch in place. Trim seam to reduce the bulk. Snip at the back center V just short of the stitching as well as along the curved edges of the armholes and front neck line. Be careful that you don’t clip the stitching on the seam. If you do, restitch that section just a bit inside the original stitching. Turn the lining so it is inside the dress and press the seam.
Tip I prefer to stitch the lining in place leaving the edges where the straps will be attached un-sewn. This way I don’t have to worry about the straps getting caught in a seam where they aren’t supposed to be. I also like to have the back bodice the same width as the straps where they are sewn together. The pattern actually has the bodice section wider than the straps but I think it looks nice to have the edges of the straps line up evenly with the edges of the bodice.

11) With lining and dress attached, you now need to create a casing on each side for elastic. Topstitch approximately ¾” from the dress edge between the front seam and back seam. Repeat with the other side. Insert elastic cut to length into each casing. Stitch each end to secure.
Tip The size of the casing will vary depending on the size of the elastic used. I typically use ½” elastic.
Tip When securing the ends of the elastic, I ‘stitch in the ditch’, aka sew in the seam between the center and side pieces. After stitching once, I backstitch and stitch again.

12) Topstitch the upper edge of bodice front and back.
Tip Topstitching isn't mandatory but I think it helps keep the lining in place plus it gives a nice finished look to the bodice.
13) Finish the hem. The pattern calls for a simple hem. If you prefer, you can add a ruffle to the bottom.
Tip Be aware that a ruffle will make the finished length longer than what is listed on the pattern! If you want to add a ruffle without adding length, you'll need adjust the lengths of the other pieces to compensate for the length of the ruffle. For example, if you are adding a ruffle that will be 2 inches long when finished, take 1/2" off the bottom edge of the bodice and lower pieces, 1" off the length of the middle pieces and 2" off the length of the side piece.
14) Determine the size and position of the buttonholes. Stitch holes on both sides of the front bodice. Determine where you want the buttons on the straps and stitch in place.
Tip Buttons are not the only way to secure the straps. Other options include clasps, knots, snaps, etc.
15) Congratulations, you are finished! Now all you need to do is sit back and watch your little princess glow as she models your latest creation.
Although the pattern and instructions are easy to follow, I know some people find it helps to have more detailed steps and photos of the process. As such, I decided to document the main steps I go through as I create a dress. I hope this helps others as they start their own exploration of the possibilities with this pattern.
1) Farbenmix patterns are done in the 'Euro' style and do not include seam allowance. All pieces and sizes are printed on a single page of large paper. The pieces are not intended to be cut from that paper but instead it's necessary to trace each piece. Where the line is solid, all sizes share the same line. Where the sizes differ, the lines for each size is printed in a different type of line, i.e. dots, dashes, etc.
Tip Go over the lines of the size you need with a colored pencil, crayon, highlighter or other tool to make it easier to see the line when tracing as described in step 2.
2) Trace all pattern pieces adding an even seam allowance to all sides of the piece EXCEPT where an edge is placed along a fold when cutting the fabric. For the Vida, this includes the center edge of these pieces: front upper (bodice), back upper (bodice), front bodice lining, back bodice lining, front/back middle and front/back lower. Transfer all pattern markings, such as grain line, to the traced piece. It also helps to label the pieces with their name and the size as well.
Tip Plain white tissue paper is an inexpensive material to use for this purpose. However, if you'll be using the pattern repeatedly, using something more durable is a good idea. One option is to use non-woven lightweight interfacing (not the fusible kind). There is a product available at many fabric stores called Pattern Ease that is specifically designed for this type of use.
Tip A simple tool to help you get an even seam allowance are two pencils taped or held together with a rubber band. Follow the line of the pattern with one pencil and have the other positioned so it goes along the outside of the pattern. As you trace the line, the second pencil will draw a parallel line that will be your cutting line.
Tip I make dresses in a variety of sizes so I started color-coding my patterns when I trace them. For example all pieces for the size 86/92 are traced onto yellow tissue paper. This makes it easier for me to quickly find the right pattern pieces especially if I'm cutting two sizes out at once... something I do occasionally for sisters.
3) Cut all pieces as indicated on the pattern cutting list. Be sure to follow the markings for the grain line. For the pieces to be cut along the fold, place fabric with right sides together with the fold following the lengthwise grain of the fabric.
Tip I love to use a different fabric for each main section of the dress. For example one fabric will be used for the front and back upper (bodice), a second for the front/back middle, a third for the front/back lower, a 4th for the straps (and I also use that fabric for an added bottom ruffle not included in the pattern) and one or two additional fabrics for the sides. I hate to use my wonderful fabric prints where they don't show so I typically use a solid fabric for the bodice lining.
Tip If you plan to use different prints for the side panels, make sure you cut 2 with the pattern piece facing up (on the wrong side of the fabric) and 2 with the pattern piece facing down (on the wrong side of the fabric). What I like to do is use 2 different prints for the side. I have one fabric placed with right side up and lay the second over it with right side down. I then cut one set of pieces with the pattern right side up and repeat it exactly the same for the second set of pieces. By doing it this way, when the dress is finished, no two pieces of the same fabric are sewn together.
Tip The side panels need to be cut slightly on the bias. This means the grain goes on an angle across the piece rather than straight up and down. To be sure I have the pattern piece oriented correctly, I measure from the marking on the pattern to the selvage of the fabric at both ends of the pattern piece.
4) Once all pieces are cut, it's time to add any appliqué or similar embellishment that won't be added over a seam.
5) Stitch the lower edge of the front upper (bodice) to the top edge of the front middle with right sides together. Make sure the center of each piece lines up. Repeat with the back upper (bodice) and back middle pieces. Finish the seam and press toward the bodice.
Tip Once these pieces are stitched and the seam is finished, now is a good time to add ricrac or a similar trim over the seam line. This way the cut edge of the trim will be enclosed in seams in a later step.
6) Stitch the lower edge of the front middle to the top edge of the front lower piece with right sides together. Make sure the center of each piece lines up. Repeat with the back middle and back lower pieces. Finish the seam and press toward the lower pieces.
Tip Because the edges being sewn together are curved, it may help to pin the pieces before stitching.
Tip As much as I try to be accurate when tracing, cutting and stitching, I find that I usually have slight 'overhang' where one piece might be slightly longer/wider than the piece to which it's sewn. When that happens, I just carefully trim the excess so it lines up evenly.
Tip Although the pattern does not include ruffles, it's simple to add them to the bottom edge of the front/back middle. The size of the ruffles can vary based on your preference. I like to have the ruffles approximately 2" long after one edge is finished (this includes the seam allowance). I make the width before gathering twice the width of the lower edge of the middle piece. I don't worry about exact measurements, though. Basically I cut strips the full width of the fabric (42-44" wide), hem and gather with my ruffler foot. When I pin it in place, I trim off any excess length. The only problem with this method is that I find it hard to toss those little ruffles. Some day I'll gather then all up and use them in a twirl skirt. LOL
Tip Once these pieces are stitched and the seam is finished, now is a good time to add ricrac or a similar trim over the seam line (or above the ruffle if one is added). Since the seam curves slightly, make sure whatever trim you use can follow the curve easily. That's why I like using ricrac on this seam. The seam at the bodice bottom is straight so non-curving trim, such as embroidered ribbon, can be used there easily.
7) Stitch one side piece to the assembled front middle pieces with right sides together. Make sure the edge of the side piece stitched is the edge that curves outward at the middle (convex). Repeat with the other side piece that is a mirror image of the one used. Finish the seams and press toward the side. Repeat for the back piece. With right sides together, stitch assembled front and back along both side seams. Finish the seam and press toward the back.
Tip Because the edges being sewn together are curved, it may help to pin the pieces before stitching.
Tip Once the side pieces are stitched to the front and back, more trim or decorative stitching can be used on the finished seams.
8) Stitch front bodice lining to back bodice lining at the side seams. Finish edges and press toward the front. Attach fusible interfacing to back center V and where the buttonholes will be located on the front.
Tip To finish the lower edge of the lining, once the side seams are finished I serge along the lower edge trimming just a small amount as I go. This allows me to easily turn up an even amount as I press. I then stitch this in place.
Tip I suggest pressing the lining side seams to the front so there is less bulk where the lining seams and dress side seams meet.
9) Fold one strap piece along the length right sides together and stitch the long edge only. Finger press the seam open and position the seam in the center. Stitch the short edge and trim excess fabric. Press the center seam open. Trim the excess fabric from the end including clipping the corners at an angle. This makes it easier to get a nice crisp point on each corner. Turn right side out and press again to center the seam along the back center of the strap. Repeat with second strap.
Tip Even more ricrac or trim can be added to the strap. Sew it down the center of the strap lengthwise before stitching the strap. Once the length and end seams are sewn and the strap turned right side out, the trim should be centered on the finished strap.
10) With lining inside out and dress right side out, pin the lining to the dress making sure to match the side seams, center front and center back. Stitch along the top edge leaving the place where the straps will be attached un-stitched. Insert straps between lining and dress so the unfinished edge lines up with the edge of the lining. The strap seam should be facing the right side of the lining. Stitch in place. Trim seam to reduce the bulk. Snip at the back center V just short of the stitching as well as along the curved edges of the armholes and front neck line. Be careful that you don’t clip the stitching on the seam. If you do, restitch that section just a bit inside the original stitching. Turn the lining so it is inside the dress and press the seam.
Tip I prefer to stitch the lining in place leaving the edges where the straps will be attached un-sewn. This way I don’t have to worry about the straps getting caught in a seam where they aren’t supposed to be. I also like to have the back bodice the same width as the straps where they are sewn together. The pattern actually has the bodice section wider than the straps but I think it looks nice to have the edges of the straps line up evenly with the edges of the bodice.
11) With lining and dress attached, you now need to create a casing on each side for elastic. Topstitch approximately ¾” from the dress edge between the front seam and back seam. Repeat with the other side. Insert elastic cut to length into each casing. Stitch each end to secure.
Tip The size of the casing will vary depending on the size of the elastic used. I typically use ½” elastic.
Tip When securing the ends of the elastic, I ‘stitch in the ditch’, aka sew in the seam between the center and side pieces. After stitching once, I backstitch and stitch again.
12) Topstitch the upper edge of bodice front and back.
Tip Topstitching isn't mandatory but I think it helps keep the lining in place plus it gives a nice finished look to the bodice.
13) Finish the hem. The pattern calls for a simple hem. If you prefer, you can add a ruffle to the bottom.
Tip Be aware that a ruffle will make the finished length longer than what is listed on the pattern! If you want to add a ruffle without adding length, you'll need adjust the lengths of the other pieces to compensate for the length of the ruffle. For example, if you are adding a ruffle that will be 2 inches long when finished, take 1/2" off the bottom edge of the bodice and lower pieces, 1" off the length of the middle pieces and 2" off the length of the side piece.
14) Determine the size and position of the buttonholes. Stitch holes on both sides of the front bodice. Determine where you want the buttons on the straps and stitch in place.
Tip Buttons are not the only way to secure the straps. Other options include clasps, knots, snaps, etc.
15) Congratulations, you are finished! Now all you need to do is sit back and watch your little princess glow as she models your latest creation.
Welcome
Hopefully the old adage about the 'third time' will be accurate for this blog. I've attempted to keep up on blogging twice in the past but lost focus after a few months. I'm going to try to do some tutorials and other useful posts this time in hopes I'll have more motivation to keep adding new things.
Subscribe to:
Posts (Atom)

